> ## Documentation Index
> Fetch the complete documentation index at: https://docs.getpostern.com/llms.txt
> Use this file to discover all available pages before exploring further.
# Connect Google and Gmail
> Gmail with an app password. Calendar and contacts with your own Google Cloud app. The two parts are independent — do either one, or both.
**Before you start**
* **About 20 minutes.** 5 minutes for Gmail, 15 for calendar and contacts.
* **The Google account you want Postern to read.** Sign in to that one account first. Both secrets
below must belong to it.
* **Your password manager, open.** Google shows two secrets once each, in dialogs you can close by
accident.
* **Postern is running, and `http://localhost:8787` answers in the browser in front of you.**
Google sends the sign-in back to that address. If Postern runs on another machine, [set up
remote access](/start/remote-access#ssh-tunnel) first.
## Choose your path
Gmail uses an app password. Calendar and contacts use a Google Cloud app you register yourself.
Postern never asks Google for access to your mail, and the Cloud app you build below requests no
Gmail permission. [Why Gmail uses a password instead of a Google
sign-in](/reference/provider-sign-ins#what-each-provider-needs-and-why)
Part A is the first 2 steps below. Part B is the 8 steps after them.
| If you want… | Then |
| -------------------------- | ----------------------------------------------------------------------------------------------------------------------------------- |
| mail | [Part A](#two-step-verification) — 2-Step Verification, then one app password. About 5 minutes. |
| calendar and contacts | [Part B](#create-project) — one Google Cloud project, one OAuth client, one sign-in. About 15 minutes. |
| all three | [Part A](#two-step-verification), then [Part B](#create-project). Neither part depends on the other. |
| a Google Workspace account | Choose **External** in [Part B](#consent-screen). **Internal** appears only on Workspace accounts, and this page does not cover it. |
Go to [myaccount.google.com](https://myaccount.google.com). Open **Security and sign-in** in the left
column. Under **How you sign in to Google**, find the **2-Step Verification** row and turn it on.
Google asks for your password, then a phone number, then a code it sends to that phone. Keep your
phone with you.
Google offers app passwords only to accounts with 2-Step Verification on. While that row reads
`2-Step Verification is off`, the page in the next step does not exist, and the words **App
passwords** appear nowhere in your Google Account. This changes your Google account, not Postern.
Open this address directly. The **Security and sign-in** page does not link to it.
```text theme={"system"}
myaccount.google.com/apppasswords
```
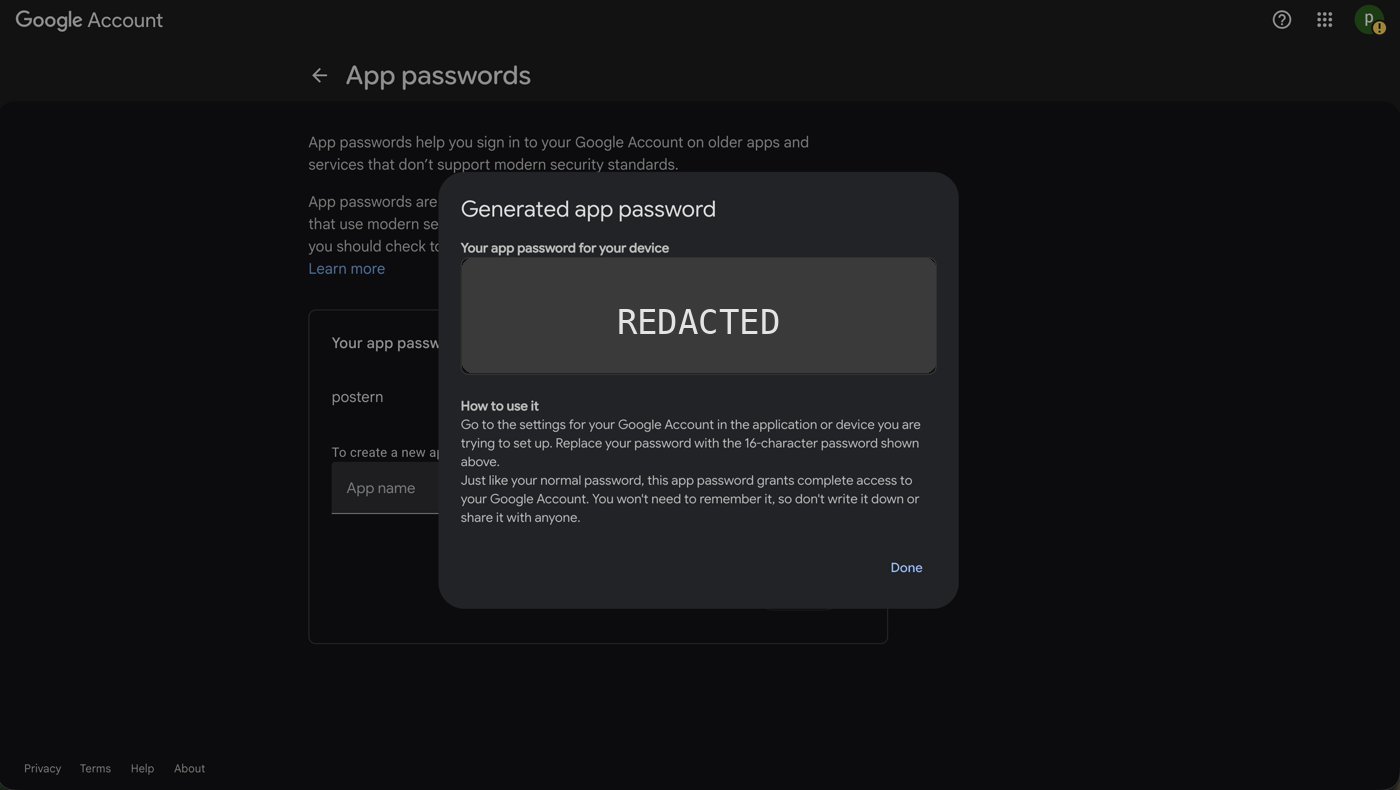
The page heading reads **App passwords**. In the **App name** field, type `Postern`, then create it.
Google opens a dialog headed **Generated app password**, under the line **Your app password for
your device**. The password is 16 characters. The Console's own **App password** field shows the
shape it expects: `xxxx xxxx xxxx xxxx`.
Google shows those 16 characters once. Copy them before you press **Done** — nothing can show them
again. If the dialog closes first, delete that entry on the **App passwords** page and create
another. Nothing else changes.
Google's own note under the password, headed **How to use it**, carries the reason: "…this app
password grants complete access to your Google Account." Keep it in your password manager.
Copy the 16 characters, then press **Done**.
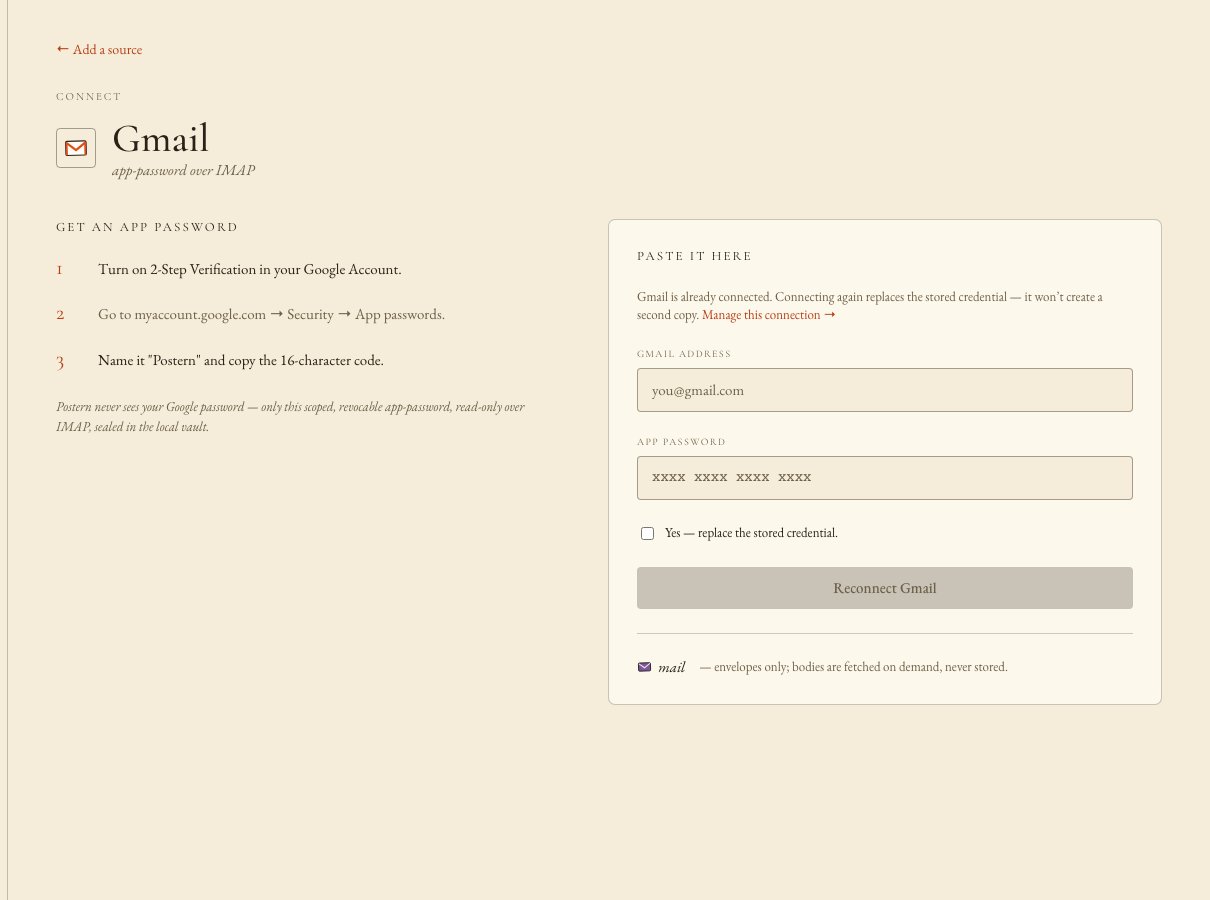
 In the Console, open **Sources** → **Add a source** → **Gmail**, or go straight to
`http://localhost:8787/connect/gmail`. Type your full Gmail address into **Gmail address**, and the
16 characters into **App password**. Spaces do not matter. Press **Connect Gmail**.
The Gmail screen then reads that Gmail is connected, and the button changes to **Reconnect Gmail**.
The connection appears under **Sources** as **mail**. Open it and press **Sync now** to force a
first read. The connection reads **Awaiting first sync** until that lands, then **Last synced** and
a time.
In the Console, open **Sources** → **Add a source** → **Gmail**, or go straight to
`http://localhost:8787/connect/gmail`. Type your full Gmail address into **Gmail address**, and the
16 characters into **App password**. Spaces do not matter. Press **Connect Gmail**.
The Gmail screen then reads that Gmail is connected, and the button changes to **Reconnect Gmail**.
The connection appears under **Sources** as **mail**. Open it and press **Sync now** to force a
first read. The connection reads **Awaiting first sync** until that lands, then **Last synced** and
a time.
 If the Console answers `A Gmail app password is 16 characters — check you copied all of it (spaces
are fine, they’re ignored).`, part of the password did not come across. Copy it again from the
dialog, or create a new app password.
Everything in Part B happens inside one Google Cloud project. Stay in it for every step below.
Go to [console.cloud.google.com](https://console.cloud.google.com) and sign in as the account that
will own the app. Open the project picker at the top of the page. Until you are inside a project it
reads **Select a project**. Press **Create project**.
The page heading reads **New Project**. **Project name** arrives prefilled with `My Project` and a
number — replace it with a name you will recognise. Under the field Google prints `Project ID:` with
an identifier it generated, then `It cannot be changed later.` Leave **Parent resource** at
`No organisation`. Press **Create**.
Then reopen the picker and select the new project. Google does not always switch you into it. Once
it has, the picker carries the project name on every page in this part.
On an account's first visit to the Cloud console, Google opens a dialog headed `Welcome, !`,
with your own account name in place of ``. It holds a **Country** list and a **Terms of
Service** checkbox that reads `I agree to the Google Cloud Platform Terms of Service, and the terms
of service of any applicable services and APIs.` Tick that checkbox and press **Agree and
continue**.
A banner then sits across the top of every page. On an account that has never tried the paid tier
it reads `Start your free trial with $300 in credit.` and carries **Learn more**, **Dismiss** and
**Start free**. On an account whose trial has ended it reads `Your free trial is over but you can
still access 20+ always-free products with a full account.` and carries **Learn more** and
**Activate**. Postern needs neither. Ignore the banner, or press **Dismiss** where it offers one.
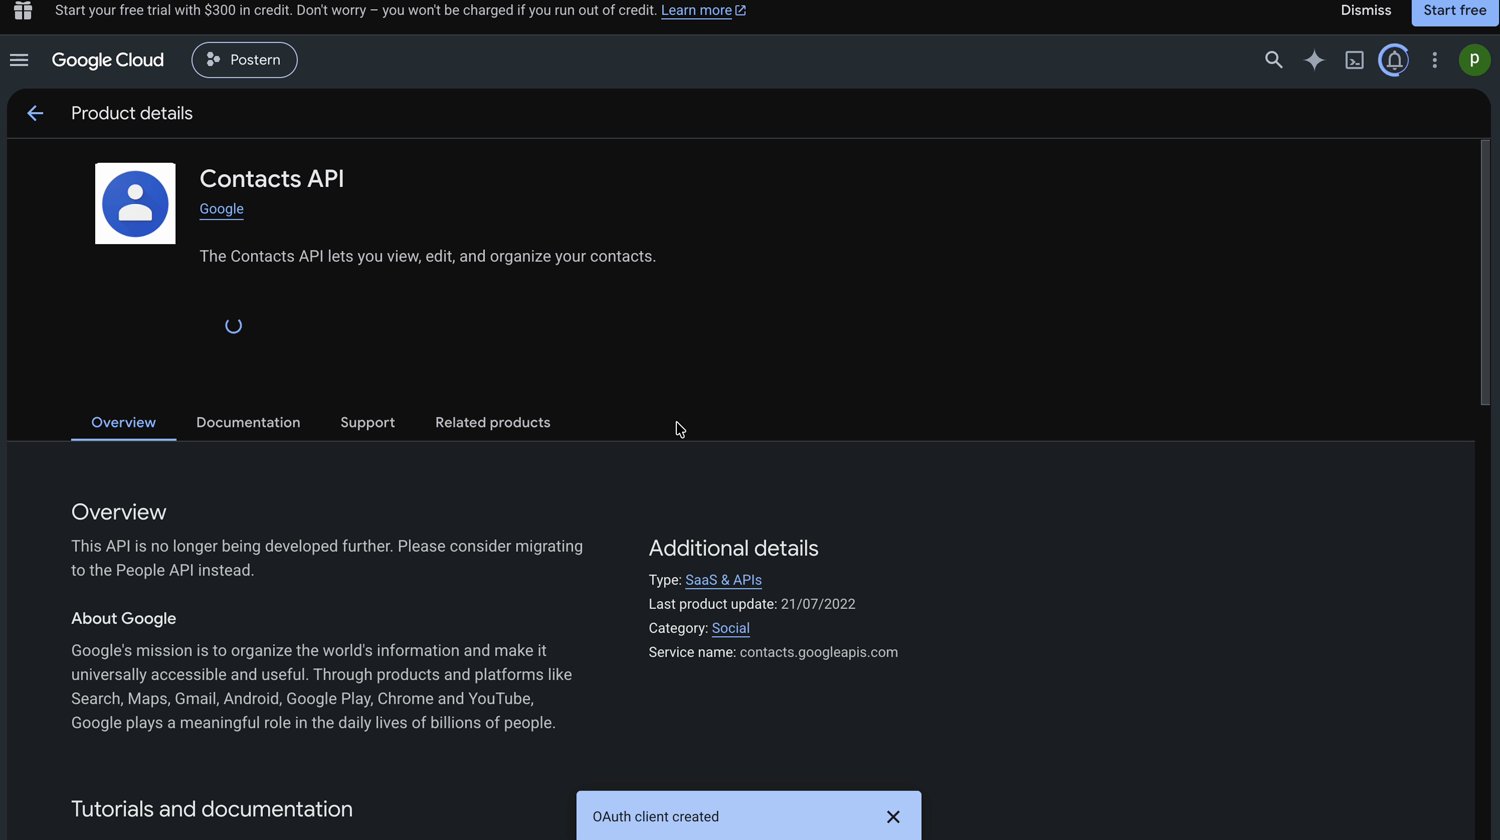
A search for `contacts` shows the old **Contacts API** first, and it does nothing for Postern.
Contacts come through the **People API**. The old one names itself: its **Additional details**
block reads `Service name: contacts.googleapis.com` and `Last product update: 21/07/2022`, and its
overview says "This API is no longer being developed further. Please consider migrating to the
People API instead." If you land there, go back and open the **People API** card instead.
In that project, open **APIs and services** → **Library** in the left column. The breadcrumb reads
`APIs and services / API library / Browse`, and the page heading reads **API Library**.
Search for `calendar`. Google returns 4 cards: **Google Calendar API**, **Calendar MCP API**,
**CalDAV API** and **Workspace MCP API**. Click **Google Calendar API**, the one by
*Google Enterprise API*. A search result is a card, not a button.
The card opens a page headed **Product details**, with the tabs **Overview**, **Documentation**,
**Support** and **Related products**. Its **Additional details** block reads
`Service name: calendar-json.googleapis.com`. That is the right one, even though it does not read
`calendar.googleapis.com`.
Enable the API from that page. The heading then reads **API/Service details**, `Status` reads
**Enabled**, and **Disable API** sits at the top.
Do the same for `People API`.
Wait a minute or two after the second one before you connect from the Console.
Postern's Console writes this route as **APIs & Services** → **Library**. Google's own screen
writes **APIs and services**, with no ampersand. Two spellings, one place.
If the Console answers `A Gmail app password is 16 characters — check you copied all of it (spaces
are fine, they’re ignored).`, part of the password did not come across. Copy it again from the
dialog, or create a new app password.
Everything in Part B happens inside one Google Cloud project. Stay in it for every step below.
Go to [console.cloud.google.com](https://console.cloud.google.com) and sign in as the account that
will own the app. Open the project picker at the top of the page. Until you are inside a project it
reads **Select a project**. Press **Create project**.
The page heading reads **New Project**. **Project name** arrives prefilled with `My Project` and a
number — replace it with a name you will recognise. Under the field Google prints `Project ID:` with
an identifier it generated, then `It cannot be changed later.` Leave **Parent resource** at
`No organisation`. Press **Create**.
Then reopen the picker and select the new project. Google does not always switch you into it. Once
it has, the picker carries the project name on every page in this part.
On an account's first visit to the Cloud console, Google opens a dialog headed `Welcome, !`,
with your own account name in place of ``. It holds a **Country** list and a **Terms of
Service** checkbox that reads `I agree to the Google Cloud Platform Terms of Service, and the terms
of service of any applicable services and APIs.` Tick that checkbox and press **Agree and
continue**.
A banner then sits across the top of every page. On an account that has never tried the paid tier
it reads `Start your free trial with $300 in credit.` and carries **Learn more**, **Dismiss** and
**Start free**. On an account whose trial has ended it reads `Your free trial is over but you can
still access 20+ always-free products with a full account.` and carries **Learn more** and
**Activate**. Postern needs neither. Ignore the banner, or press **Dismiss** where it offers one.
A search for `contacts` shows the old **Contacts API** first, and it does nothing for Postern.
Contacts come through the **People API**. The old one names itself: its **Additional details**
block reads `Service name: contacts.googleapis.com` and `Last product update: 21/07/2022`, and its
overview says "This API is no longer being developed further. Please consider migrating to the
People API instead." If you land there, go back and open the **People API** card instead.
In that project, open **APIs and services** → **Library** in the left column. The breadcrumb reads
`APIs and services / API library / Browse`, and the page heading reads **API Library**.
Search for `calendar`. Google returns 4 cards: **Google Calendar API**, **Calendar MCP API**,
**CalDAV API** and **Workspace MCP API**. Click **Google Calendar API**, the one by
*Google Enterprise API*. A search result is a card, not a button.
The card opens a page headed **Product details**, with the tabs **Overview**, **Documentation**,
**Support** and **Related products**. Its **Additional details** block reads
`Service name: calendar-json.googleapis.com`. That is the right one, even though it does not read
`calendar.googleapis.com`.
Enable the API from that page. The heading then reads **API/Service details**, `Status` reads
**Enabled**, and **Disable API** sits at the top.
Do the same for `People API`.
Wait a minute or two after the second one before you connect from the Console.
Postern's Console writes this route as **APIs & Services** → **Library**. Google's own screen
writes **APIs and services**, with no ampersand. Two spellings, one place.
 The consent screen has to exist before Google will create an OAuth client. The shortest route to it
is the page that refuses you.
In the same project, open **Google Auth Platform** → **Clients** → **Create client**. Google stops
you on a bar that reads **To create an OAuth client ID, you must first configure your consent
screen**. Press **Configure consent screen** on that bar.
The page heading reads **Project configuration**. It carries four numbered steps — **App
Information**, **Audience**, **Contact Information** and **Finish** — with **Create** and **Cancel**
at the bottom throughout. Google's older name for all this is the OAuth consent screen, and
Postern's Console still uses that name.
**1 · App Information.** Type a name into **App name**, which Google marks required. Its note reads
"The name of the app asking for consent". Google prints that name on every screen you meet from here
on, including its refusals. Name it `Postern`. Then pick your own address in **User support email**,
also required, whose note reads "For users to contact you with questions about their consent." Press
**Next**.
**2 · Audience.** Two options, each with its own description:
| option | Google's own description of it |
| ------------ | -------------------------------------------------------------------------------------------------------------------------------------------------------------------------------------------------------------------------------------------------- |
| **External** | "Available to any test user with a Google Account. Your app will start in testing mode and will only be available to users that you add to the list of test users. Once your app is ready to push to production, you may need to verify your app." |
| **Internal** | "Only available to users within your organisation. You will not need to submit your app for verification." |
Choose **External**. Press **Next**.
On a personal Google account **Internal** cannot be chosen, and one note is the only thing that
says why. Hover **Internal** and it reads: "Because you're not a Google Workspace user, you can
only make your app available to external (general audience) users."
**Audience** is also required, and Google prints no message when you skip it. Press **Next** with
neither option chosen, and the blue `2` beside **Audience** turns into a red error mark. That mark
is the whole warning.
**3 · Contact Information.** Type your own address into **Email addresses**, which Google marks
required. Its note reads "These email addresses are for Google to notify you about any changes to
your project." Press **Next**.
**4 · Finish.** Press **Create**.
A message reads `OAuth configuration created.`, and you land on a page headed **OAuth overview**.
Under **Metrics** it reads "You haven't configured any OAuth clients for this project yet." with a
**Create OAuth client** button. That is correct. The client comes two steps from here, and there is
one thing to do first.
The same bar appears on **APIs and services** → **Credentials**, worded differently: **Remember to
configure the OAuth consent screen with information about your application.** Its
**Configure consent screen** button opens the same wizard.
Skip this step and Google refuses your own sign-in. While **Publishing status** is **Testing**,
only the accounts listed here may sign in — and a new app lists nobody, not even the account that
created it. The step costs 10 seconds, and nothing after this page works without it.
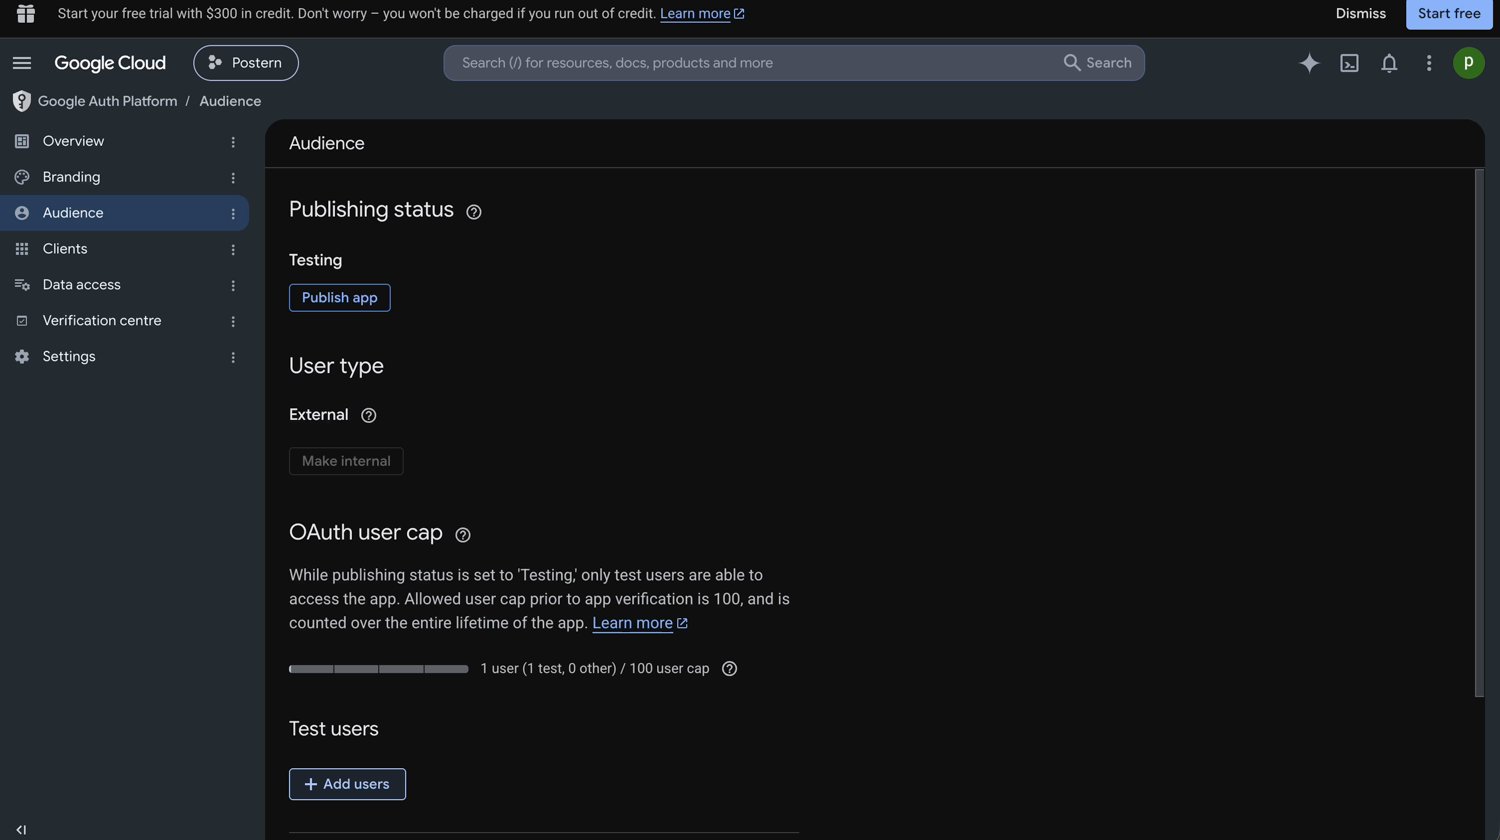
In the same project, open **Google Auth Platform** → **Audience**. Four sections sit on that page:
| section | what it reads on a new app |
| --------------------- | ------------------------------------------------------------------------------------------------------------------------------------------------------------------------------------------------- |
| **Publishing status** | **Testing**, with a **Publish app** button |
| **User type** | **External**, with a **Make internal** button, greyed out on a personal account |
| **OAuth user cap** | "While publishing status is set to 'Testing,' only test users are able to access the app. Allowed user cap prior to app verification is 100, and is counted over the entire lifetime of the app." |
| **Test users** | a **+ Add users** button |
Under **Test users**, press **+ Add users**. Add the Google address you will sign in as, and save it.
**Test users** then lists that address, and the **OAuth user cap** meter reads
`1 user (1 test, 0 other) / 100 user cap`.
The consent screen has to exist before Google will create an OAuth client. The shortest route to it
is the page that refuses you.
In the same project, open **Google Auth Platform** → **Clients** → **Create client**. Google stops
you on a bar that reads **To create an OAuth client ID, you must first configure your consent
screen**. Press **Configure consent screen** on that bar.
The page heading reads **Project configuration**. It carries four numbered steps — **App
Information**, **Audience**, **Contact Information** and **Finish** — with **Create** and **Cancel**
at the bottom throughout. Google's older name for all this is the OAuth consent screen, and
Postern's Console still uses that name.
**1 · App Information.** Type a name into **App name**, which Google marks required. Its note reads
"The name of the app asking for consent". Google prints that name on every screen you meet from here
on, including its refusals. Name it `Postern`. Then pick your own address in **User support email**,
also required, whose note reads "For users to contact you with questions about their consent." Press
**Next**.
**2 · Audience.** Two options, each with its own description:
| option | Google's own description of it |
| ------------ | -------------------------------------------------------------------------------------------------------------------------------------------------------------------------------------------------------------------------------------------------- |
| **External** | "Available to any test user with a Google Account. Your app will start in testing mode and will only be available to users that you add to the list of test users. Once your app is ready to push to production, you may need to verify your app." |
| **Internal** | "Only available to users within your organisation. You will not need to submit your app for verification." |
Choose **External**. Press **Next**.
On a personal Google account **Internal** cannot be chosen, and one note is the only thing that
says why. Hover **Internal** and it reads: "Because you're not a Google Workspace user, you can
only make your app available to external (general audience) users."
**Audience** is also required, and Google prints no message when you skip it. Press **Next** with
neither option chosen, and the blue `2` beside **Audience** turns into a red error mark. That mark
is the whole warning.
**3 · Contact Information.** Type your own address into **Email addresses**, which Google marks
required. Its note reads "These email addresses are for Google to notify you about any changes to
your project." Press **Next**.
**4 · Finish.** Press **Create**.
A message reads `OAuth configuration created.`, and you land on a page headed **OAuth overview**.
Under **Metrics** it reads "You haven't configured any OAuth clients for this project yet." with a
**Create OAuth client** button. That is correct. The client comes two steps from here, and there is
one thing to do first.
The same bar appears on **APIs and services** → **Credentials**, worded differently: **Remember to
configure the OAuth consent screen with information about your application.** Its
**Configure consent screen** button opens the same wizard.
Skip this step and Google refuses your own sign-in. While **Publishing status** is **Testing**,
only the accounts listed here may sign in — and a new app lists nobody, not even the account that
created it. The step costs 10 seconds, and nothing after this page works without it.
In the same project, open **Google Auth Platform** → **Audience**. Four sections sit on that page:
| section | what it reads on a new app |
| --------------------- | ------------------------------------------------------------------------------------------------------------------------------------------------------------------------------------------------- |
| **Publishing status** | **Testing**, with a **Publish app** button |
| **User type** | **External**, with a **Make internal** button, greyed out on a personal account |
| **OAuth user cap** | "While publishing status is set to 'Testing,' only test users are able to access the app. Allowed user cap prior to app verification is 100, and is counted over the entire lifetime of the app." |
| **Test users** | a **+ Add users** button |
Under **Test users**, press **+ Add users**. Add the Google address you will sign in as, and save it.
**Test users** then lists that address, and the **OAuth user cap** meter reads
`1 user (1 test, 0 other) / 100 user cap`.
 Google matches the redirect address character for character. Copy it from your own Console — do not
type it, and do not copy it from this page. Postern builds that address from its own port, so the
Console holds the only copy that stays true. [Why Postern pins the address, and never reads it off
your browser](/reference/provider-sign-ins#the-redirect-address-is-pinned-inside-postern)
Open the Console's Google screen in another tab: `http://localhost:8787/connect/google`. Its left
column lists four numbered steps. The third reads *Create an OAuth client, type Web application —
add this redirect URI, pasted exactly:*. Under it sits the address, with a **Copy** button beside it.
Press **Copy**. The button then reads **Copied**. On a stock install the address reads:
```text theme={"system"}
http://localhost:8787/api/oauth/google/callback
```
Back in the Cloud console, open **Google Auth Platform** → **Clients** → **Create client**. The page
heading reads **Create OAuth client ID**.
Choose **Web application** in **Application type**, which Google marks required.
Type a name into **Name**, also required. It arrives prefilled with `Web client 1`. Google's note
reads "The name of your OAuth 2.0 client. This name is only used to identify the client in the
console and will not be shown to end users."
Under **Authorised redirect URIs** — the section whose note reads "For use with requests from a web
server" — press **+ Add URI**. A field appears, labelled **URIs 1** and marked required, which shows
`https://www.example.com` until you type. Paste the address you copied.
Do not use **Authorised JavaScript origins** above it, whose note reads "For use with requests from a
browser".
Both section labels change spelling with the account's language. These captures read `Authorised`;
other accounts read `Authorized`, with a z. Match a section by its note, not by its spelling.
Google shows the client secret once, in the dialog it opens the moment you press **Create**. Its
own wording: "You will no longer be able to view or download the client secret once you close this
dialogue. Make sure that you have copied or downloaded the information below and stored it
securely." Copy the client ID and the client secret before you close it. The client ID stays
readable afterwards; the secret never does. The only way back is to delete the client and create
another, which changes the client ID too.
Press **Create**. Google opens a dialog headed **OAuth client created**. It holds **Client ID**,
**Client secret**, **Creation date**, `Status` **Enabled** and a **Download JSON** control. Each of
the two values has a copy control beside it. Copy both now, then press **OK**.
Two lines in that dialog matter. One reads "The client ID can always be accessed from the Clients tab
under the Google Auth Platform." The other repeats the last step's rule: "OAuth access is restricted
to the test users listed on your OAuth consent screen".
Google's own note at the foot of the form reads "Note: It may take five minutes to a few hours for
settings to take effect".
Google's **APIs and services** → **Credentials** page lists the same clients, under **OAuth 2.0
Client IDs**. Either route reaches them.
Go back to the Console's Google screen (`http://localhost:8787/connect/google`). Under **Configure
the app**, paste the client ID into **Client ID**, and the client secret into **Client secret**.
Google needs both halves. With only the ID, the Console answers `Google is a confidential client —
paste the client secret too, or the sign-in will be refused.`
Sign in as the address you added under **Test users**. Google refuses every other account,
whichever one the browser is already signed into. Its refusal fills the page, and it names your
app:
`Access blocked: Postern has not completed the Google verification process`
`Postern has not completed the Google verification process. The app is currently being tested and
can only be accessed by developer-approved testers. If you think that you should have access,
contact the developer.`
`If you are a developer of Postern, see error details.` · `Error 403: access_denied`
Google prints whatever you typed into **App name**, so your own copy carries that name where this
one reads `Postern`. Nothing was saved. Add the address under
[**Test users**](#test-users), then start again from the Console's Google screen.
Press **Save & sign in with Google**. The button reads `Redirecting...`, and Google's account chooser
opens in the same tab. The Console hands that tab over, so finish anything else you have open in it
first.
Google matches the redirect address character for character. Copy it from your own Console — do not
type it, and do not copy it from this page. Postern builds that address from its own port, so the
Console holds the only copy that stays true. [Why Postern pins the address, and never reads it off
your browser](/reference/provider-sign-ins#the-redirect-address-is-pinned-inside-postern)
Open the Console's Google screen in another tab: `http://localhost:8787/connect/google`. Its left
column lists four numbered steps. The third reads *Create an OAuth client, type Web application —
add this redirect URI, pasted exactly:*. Under it sits the address, with a **Copy** button beside it.
Press **Copy**. The button then reads **Copied**. On a stock install the address reads:
```text theme={"system"}
http://localhost:8787/api/oauth/google/callback
```
Back in the Cloud console, open **Google Auth Platform** → **Clients** → **Create client**. The page
heading reads **Create OAuth client ID**.
Choose **Web application** in **Application type**, which Google marks required.
Type a name into **Name**, also required. It arrives prefilled with `Web client 1`. Google's note
reads "The name of your OAuth 2.0 client. This name is only used to identify the client in the
console and will not be shown to end users."
Under **Authorised redirect URIs** — the section whose note reads "For use with requests from a web
server" — press **+ Add URI**. A field appears, labelled **URIs 1** and marked required, which shows
`https://www.example.com` until you type. Paste the address you copied.
Do not use **Authorised JavaScript origins** above it, whose note reads "For use with requests from a
browser".
Both section labels change spelling with the account's language. These captures read `Authorised`;
other accounts read `Authorized`, with a z. Match a section by its note, not by its spelling.
Google shows the client secret once, in the dialog it opens the moment you press **Create**. Its
own wording: "You will no longer be able to view or download the client secret once you close this
dialogue. Make sure that you have copied or downloaded the information below and stored it
securely." Copy the client ID and the client secret before you close it. The client ID stays
readable afterwards; the secret never does. The only way back is to delete the client and create
another, which changes the client ID too.
Press **Create**. Google opens a dialog headed **OAuth client created**. It holds **Client ID**,
**Client secret**, **Creation date**, `Status` **Enabled** and a **Download JSON** control. Each of
the two values has a copy control beside it. Copy both now, then press **OK**.
Two lines in that dialog matter. One reads "The client ID can always be accessed from the Clients tab
under the Google Auth Platform." The other repeats the last step's rule: "OAuth access is restricted
to the test users listed on your OAuth consent screen".
Google's own note at the foot of the form reads "Note: It may take five minutes to a few hours for
settings to take effect".
Google's **APIs and services** → **Credentials** page lists the same clients, under **OAuth 2.0
Client IDs**. Either route reaches them.
Go back to the Console's Google screen (`http://localhost:8787/connect/google`). Under **Configure
the app**, paste the client ID into **Client ID**, and the client secret into **Client secret**.
Google needs both halves. With only the ID, the Console answers `Google is a confidential client —
paste the client secret too, or the sign-in will be refused.`
Sign in as the address you added under **Test users**. Google refuses every other account,
whichever one the browser is already signed into. Its refusal fills the page, and it names your
app:
`Access blocked: Postern has not completed the Google verification process`
`Postern has not completed the Google verification process. The app is currently being tested and
can only be accessed by developer-approved testers. If you think that you should have access,
contact the developer.`
`If you are a developer of Postern, see error details.` · `Error 403: access_denied`
Google prints whatever you typed into **App name**, so your own copy carries that name where this
one reads `Postern`. Nothing was saved. Add the address under
[**Test users**](#test-users), then start again from the Console's Google screen.
Press **Save & sign in with Google**. The button reads `Redirecting...`, and Google's account chooser
opens in the same tab. The Console hands that tab over, so finish anything else you have open in it
first.
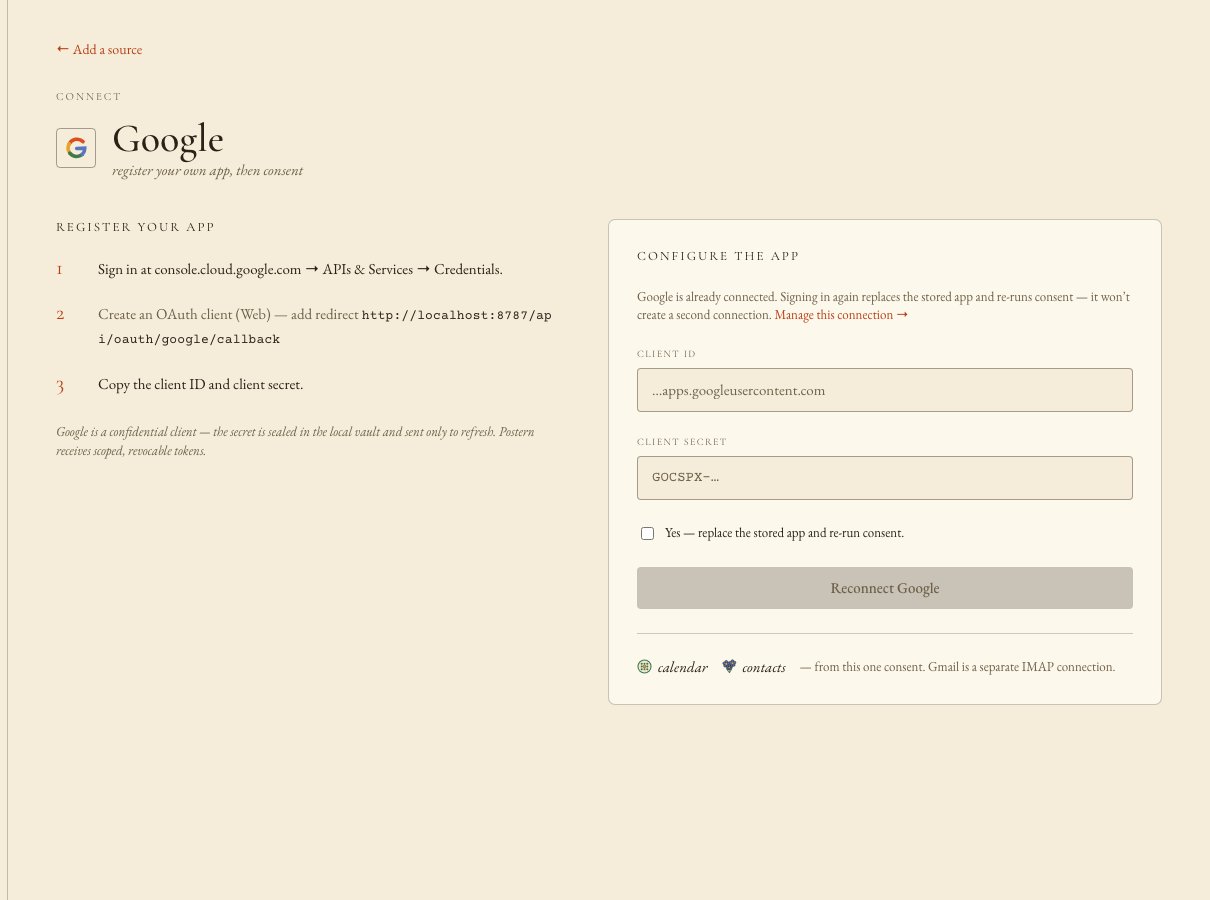 If Google refuses, the Console puts you back on this Google screen with Google's own error code
beside the form. Fix it there — the steps and both fields are on that screen.
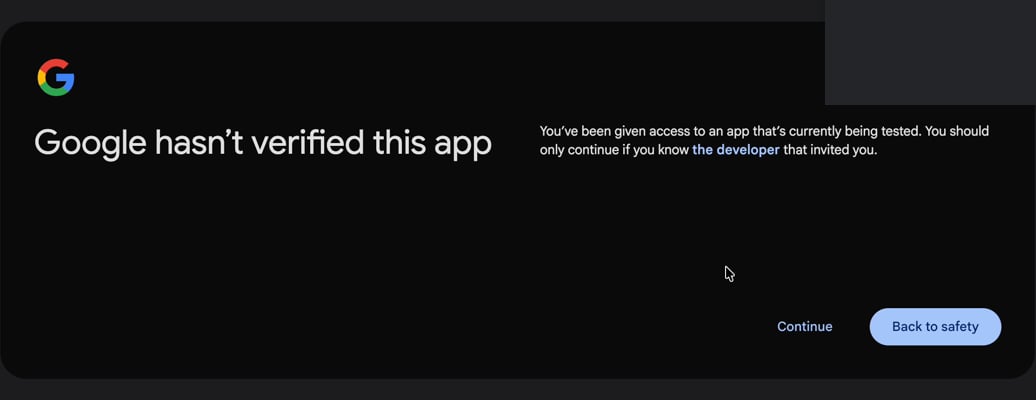
Two Google screens follow, and both read like failures.
The first says **Google hasn't verified this app**. That is what an app whose **Publishing status**
is **Testing** looks like to its own author. **Continue** is the plain text link at the bottom. The
blue **Back to safety** button cancels the sign-in.
If Google refuses, the Console puts you back on this Google screen with Google's own error code
beside the form. Fix it there — the steps and both fields are on that screen.
Two Google screens follow, and both read like failures.
The first says **Google hasn't verified this app**. That is what an app whose **Publishing status**
is **Testing** looks like to its own author. **Continue** is the plain text link at the bottom. The
blue **Back to safety** button cancels the sign-in.
 The second screen carries two headings. On the left it reads **Postern wants access to your Google
Account**, with the address you signed in as below it. Over the permission list on the right it
reads **Select what Postern can access**.
Postern asks for two permissions, and both are read-only:
* **See and download your contacts.** — `contacts.readonly`
* **See and download any calendar that you can access using your Google Calendar.** — `calendar.readonly`
No Gmail permission appears, on this screen or anywhere else.
The checkboxes start empty, and Google lets you continue with none of them ticked. That sign-in
succeeds with no error and grants nothing. Postern saves the credential and creates no connection,
so the source looks half-connected and answers nothing.
Tick **Select all**, then press **Continue**. **Cancel** sits beside it and abandons the sign-in.
Google returns you to the Console's **Sources** screen. The one sign-in becomes two connections,
**calendar** and **contacts**. [Why one sign-in creates two connections and not
one](/reference/grants-and-sectors#which-sectors-a-sign-in-turns-on)
Open either connection and press **Sync now** to force a first read. Each then shows a **Last
synced** time.
Finish the sign-in in one go, within 10 minutes after you press **Save & sign in with Google**. If
you take longer, restart Postern, or reuse an old tab, Postern refuses the return trip and the
browser shows `{"error":"invalid or expired state"}`. Postern stored nothing. Start again from the
Console's Google screen; you lose nothing.
While **Publishing status** stays **Testing**, Google expires the app's access every 7 days. Calendar
and contacts then stop until you sign in again.
To end that, open **Google Auth Platform** → **Audience** — the same page where you
[added your test user](#test-users) — and press **Publish app** under **Publishing status**. Confirm
what Google asks for.
**Publishing status** then leaves **Testing**, and the 7-day expiry stops. Google's own documentation
calls the status you land on "In production". Nobody here has captured that screen, so match it by
what it is not: **Testing**.
For a one-person app that asks for these two read-only permissions, this is a form, not a review.
This step is optional. A weekly sign-in works, and a Google app left in **Testing** is not a broken
one.
## Confirm it works
* **Sources** lists three connections: **mail**, **calendar** and **contacts**.
* Each of the three shows a **Last synced** time.
* The Console's Gmail and Google screens read that the source is connected, and their buttons read
**Reconnect Gmail** and **Reconnect Google**.
* In the project that owns your client, **Google Calendar API** and **People API** both read `Status`
**Enabled**. Each page carries **Disable API** at the top.
* On **Google Auth Platform** → **Audience**, **User type** reads **External**, and **Test users**
lists the address you signed in as.
## If something went wrong
| What you see | What to do |
| --------------------------------------------------------------------------------------------------------------------- | -------------------------------------------------------------------------------------------------------------------------------------------------------------------------------------------------------------------------------------------------------------------------------------------------------------- |
| `Access blocked: Postern has not completed the Google verification process`, with `Error 403: access_denied` under it | Your address is not listed as a test user, or you signed in as another account. Open **Google Auth Platform** → **Audience** → **+ Add users**, add it, save it, then sign in again from the Console. Google prints your own app name where this reads `Postern`. [Add yourself as a test user](#test-users) |
| `OAuth access is restricted to the test users listed on your OAuth consent screen.` | The same cause, worded differently by Google. Add your address under **Test users**, then sign in again from the Console. [Add yourself as a test user](#test-users) |
| **To create an OAuth client ID, you must first configure your consent screen** | The project has no consent screen yet. Press **Configure consent screen** on that bar. It opens the **Project configuration** wizard. [Set up the consent screen](#consent-screen) |
| **Remember to configure the OAuth consent screen with information about your application.** | The same cause, on the **Credentials** page. The **Configure consent screen** button beside it opens the same wizard. [Set up the consent screen](#consent-screen) |
| **Internal** is greyed out on the **Audience** step of the wizard | Hover **Internal**: "Because you're not a Google Workspace user, you can only make your app available to external (general audience) users." Choose **External**. Audience is required, and a skipped choice turns the step marker red with no message beside it. [Set up the consent screen](#consent-screen) |
| Contacts stay empty while calendar works | You enabled the old **Contacts API**, whose `Service name` reads `contacts.googleapis.com`. Enable the **People API** as well. [Enable the two APIs](#enable-apis) |
| A permission error on calendar or contacts right after a successful sign-in — the Console shows it as 403 | The two APIs are not enabled in the project that owns your client. Open that project's **APIs and services** → **Library**, enable **Google Calendar API** and **People API**, wait a minute or two, then press **Reconnect Google**. [Enable the two APIs](#enable-apis) |
| Google refuses before any consent screen appears, and names the redirect URI | The address under **Authorised redirect URIs** does not match. Press **Copy** on the Console's Google screen, and replace the address on the client. [Create the OAuth client](#oauth-client) |
| `{"error":"invalid or expired state"}` in the browser after you approve | The sign-in ran past 10 minutes, or Postern restarted, or you reused an old tab. Postern stored nothing. Start again from the Console's Google screen. [Paste both halves and sign in](#sign-in) |
| The Console reads that Google is connected, but no **calendar** or **contacts** connection appears under **Sources** | You approved with no permission ticked. Press **Reconnect Google**, tick **Select all**, then press **Continue**. [Tick every permission](#grant-scopes) |
| The sign-in finished at Google and the browser landed on nothing | `http://localhost:8787` did not answer in that browser, so Postern created no connection. Run the sign-in on the machine Postern runs on, or [set up remote access](/start/remote-access#ssh-tunnel) first, then start again from the Console's Google screen. |
## What you have now
Three connections: **mail** from Gmail, **calendar** and **contacts** from Google. Any agent you
grant mail, calendar or contacts reads from them.
For mail, Postern stores who sent it, the subject, the dates and the preview line. It never stores
the message text — it fetches that when an agent asks for it. Gmail comes in over IMAP, the standard
way mail apps read a mailbox, so your Gmail address is also the login.
Calendar and contacts are read-only. Postern cannot change anything in them. [Why the Google
connector can never act, whatever permission it holds](/reference/grants-and-sectors#which-sectors-an-agent-can-act-in)
What this costs you from here on:
* While **Publishing status** stays **Testing**, you sign in again every 7 days. [Publish the
app](#publish) ends that.
* Revoke the app password or the Google sign-in at your Google Account, not in Postern. Each stops
only its own connections, and a fresh sign-in overrides an earlier revocation.
* Connect a source again and Postern replaces the saved credential rather than adds a second one.
First it makes you tick a box — **Yes — replace the stored credential.** on Gmail, **Yes —
replace the stored app and re-run consent.** on Google.
* Postern encrypts the client secret and keeps it on your own machine. [Postern sends it only to
Google, only to ask for fresh access](/reference/provider-sign-ins#what-each-provider-needs-and-why)
## Next
an agent key, shown once · a few minutes, plus a restart of the agent · an agent that can reach
the machine Postern runs on
your own Entra app · about 15 minutes · public client — no secret
The second screen carries two headings. On the left it reads **Postern wants access to your Google
Account**, with the address you signed in as below it. Over the permission list on the right it
reads **Select what Postern can access**.
Postern asks for two permissions, and both are read-only:
* **See and download your contacts.** — `contacts.readonly`
* **See and download any calendar that you can access using your Google Calendar.** — `calendar.readonly`
No Gmail permission appears, on this screen or anywhere else.
The checkboxes start empty, and Google lets you continue with none of them ticked. That sign-in
succeeds with no error and grants nothing. Postern saves the credential and creates no connection,
so the source looks half-connected and answers nothing.
Tick **Select all**, then press **Continue**. **Cancel** sits beside it and abandons the sign-in.
Google returns you to the Console's **Sources** screen. The one sign-in becomes two connections,
**calendar** and **contacts**. [Why one sign-in creates two connections and not
one](/reference/grants-and-sectors#which-sectors-a-sign-in-turns-on)
Open either connection and press **Sync now** to force a first read. Each then shows a **Last
synced** time.
Finish the sign-in in one go, within 10 minutes after you press **Save & sign in with Google**. If
you take longer, restart Postern, or reuse an old tab, Postern refuses the return trip and the
browser shows `{"error":"invalid or expired state"}`. Postern stored nothing. Start again from the
Console's Google screen; you lose nothing.
While **Publishing status** stays **Testing**, Google expires the app's access every 7 days. Calendar
and contacts then stop until you sign in again.
To end that, open **Google Auth Platform** → **Audience** — the same page where you
[added your test user](#test-users) — and press **Publish app** under **Publishing status**. Confirm
what Google asks for.
**Publishing status** then leaves **Testing**, and the 7-day expiry stops. Google's own documentation
calls the status you land on "In production". Nobody here has captured that screen, so match it by
what it is not: **Testing**.
For a one-person app that asks for these two read-only permissions, this is a form, not a review.
This step is optional. A weekly sign-in works, and a Google app left in **Testing** is not a broken
one.
## Confirm it works
* **Sources** lists three connections: **mail**, **calendar** and **contacts**.
* Each of the three shows a **Last synced** time.
* The Console's Gmail and Google screens read that the source is connected, and their buttons read
**Reconnect Gmail** and **Reconnect Google**.
* In the project that owns your client, **Google Calendar API** and **People API** both read `Status`
**Enabled**. Each page carries **Disable API** at the top.
* On **Google Auth Platform** → **Audience**, **User type** reads **External**, and **Test users**
lists the address you signed in as.
## If something went wrong
| What you see | What to do |
| --------------------------------------------------------------------------------------------------------------------- | -------------------------------------------------------------------------------------------------------------------------------------------------------------------------------------------------------------------------------------------------------------------------------------------------------------- |
| `Access blocked: Postern has not completed the Google verification process`, with `Error 403: access_denied` under it | Your address is not listed as a test user, or you signed in as another account. Open **Google Auth Platform** → **Audience** → **+ Add users**, add it, save it, then sign in again from the Console. Google prints your own app name where this reads `Postern`. [Add yourself as a test user](#test-users) |
| `OAuth access is restricted to the test users listed on your OAuth consent screen.` | The same cause, worded differently by Google. Add your address under **Test users**, then sign in again from the Console. [Add yourself as a test user](#test-users) |
| **To create an OAuth client ID, you must first configure your consent screen** | The project has no consent screen yet. Press **Configure consent screen** on that bar. It opens the **Project configuration** wizard. [Set up the consent screen](#consent-screen) |
| **Remember to configure the OAuth consent screen with information about your application.** | The same cause, on the **Credentials** page. The **Configure consent screen** button beside it opens the same wizard. [Set up the consent screen](#consent-screen) |
| **Internal** is greyed out on the **Audience** step of the wizard | Hover **Internal**: "Because you're not a Google Workspace user, you can only make your app available to external (general audience) users." Choose **External**. Audience is required, and a skipped choice turns the step marker red with no message beside it. [Set up the consent screen](#consent-screen) |
| Contacts stay empty while calendar works | You enabled the old **Contacts API**, whose `Service name` reads `contacts.googleapis.com`. Enable the **People API** as well. [Enable the two APIs](#enable-apis) |
| A permission error on calendar or contacts right after a successful sign-in — the Console shows it as 403 | The two APIs are not enabled in the project that owns your client. Open that project's **APIs and services** → **Library**, enable **Google Calendar API** and **People API**, wait a minute or two, then press **Reconnect Google**. [Enable the two APIs](#enable-apis) |
| Google refuses before any consent screen appears, and names the redirect URI | The address under **Authorised redirect URIs** does not match. Press **Copy** on the Console's Google screen, and replace the address on the client. [Create the OAuth client](#oauth-client) |
| `{"error":"invalid or expired state"}` in the browser after you approve | The sign-in ran past 10 minutes, or Postern restarted, or you reused an old tab. Postern stored nothing. Start again from the Console's Google screen. [Paste both halves and sign in](#sign-in) |
| The Console reads that Google is connected, but no **calendar** or **contacts** connection appears under **Sources** | You approved with no permission ticked. Press **Reconnect Google**, tick **Select all**, then press **Continue**. [Tick every permission](#grant-scopes) |
| The sign-in finished at Google and the browser landed on nothing | `http://localhost:8787` did not answer in that browser, so Postern created no connection. Run the sign-in on the machine Postern runs on, or [set up remote access](/start/remote-access#ssh-tunnel) first, then start again from the Console's Google screen. |
## What you have now
Three connections: **mail** from Gmail, **calendar** and **contacts** from Google. Any agent you
grant mail, calendar or contacts reads from them.
For mail, Postern stores who sent it, the subject, the dates and the preview line. It never stores
the message text — it fetches that when an agent asks for it. Gmail comes in over IMAP, the standard
way mail apps read a mailbox, so your Gmail address is also the login.
Calendar and contacts are read-only. Postern cannot change anything in them. [Why the Google
connector can never act, whatever permission it holds](/reference/grants-and-sectors#which-sectors-an-agent-can-act-in)
What this costs you from here on:
* While **Publishing status** stays **Testing**, you sign in again every 7 days. [Publish the
app](#publish) ends that.
* Revoke the app password or the Google sign-in at your Google Account, not in Postern. Each stops
only its own connections, and a fresh sign-in overrides an earlier revocation.
* Connect a source again and Postern replaces the saved credential rather than adds a second one.
First it makes you tick a box — **Yes — replace the stored credential.** on Gmail, **Yes —
replace the stored app and re-run consent.** on Google.
* Postern encrypts the client secret and keeps it on your own machine. [Postern sends it only to
Google, only to ask for fresh access](/reference/provider-sign-ins#what-each-provider-needs-and-why)
## Next
an agent key, shown once · a few minutes, plus a restart of the agent · an agent that can reach
the machine Postern runs on
your own Entra app · about 15 minutes · public client — no secret