- About 20 minutes. 5 minutes for Gmail, 15 for calendar and contacts.
- The Google account you want Postern to read. Sign in to that one account first. Both secrets below must belong to it.
- Your password manager, open. Google shows two secrets once each, in dialogs you can close by accident.
- Postern is running, and
http://localhost:8787answers in the browser in front of you. Google sends the sign-in back to that address. If Postern runs on another machine, set up remote access first.
Choose your path
Gmail uses an app password. Calendar and contacts use a Google Cloud app you register yourself. Postern never asks Google for access to your mail, and the Cloud app you build below requests no Gmail permission. Why Gmail uses a password instead of a Google sign-in Part A is the first 2 steps below. Part B is the 8 steps after them.Turn on 2-Step Verification
2-Step Verification is off, the page in the next step does not exist, and the words App
passwords appear nowhere in your Google Account. This changes your Google account, not Postern.Create the app password and paste it into the Console
Postern, then create it.Google opens a dialog headed Generated app password, under the line Your app password for
your device. The password is 16 characters. The Console’s own App password field shows the
shape it expects: xxxx xxxx xxxx xxxx.Copy the 16 characters, then press Done.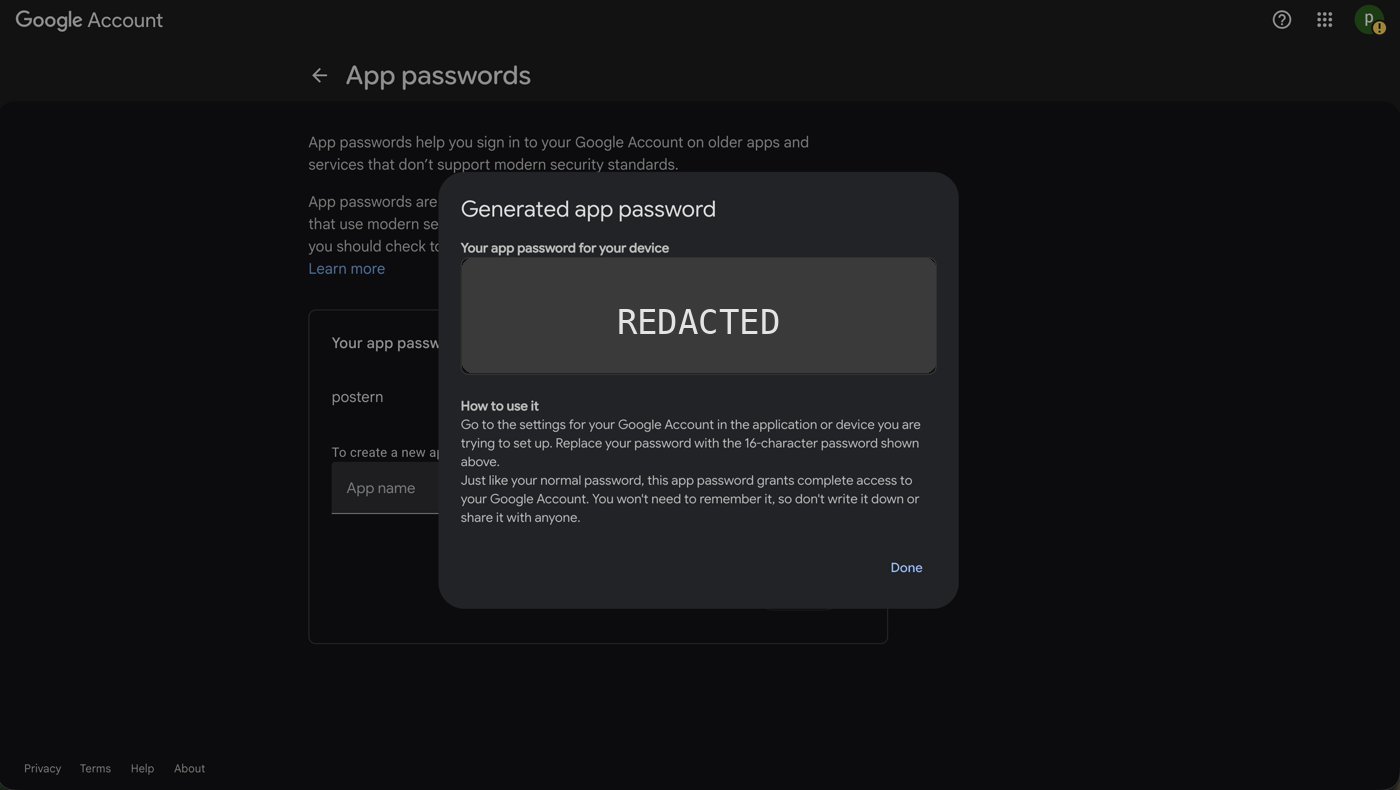
Google's App passwords page, with the Generated app password dialog open. The 16 characters are redacted here; yours are shown in full.
http://localhost:8787/connect/gmail. Type your full Gmail address into Gmail address, and the
16 characters into App password. Spaces do not matter. Press Connect Gmail.The Gmail screen then reads that Gmail is connected, and the button changes to Reconnect Gmail.
The connection appears under Sources as mail. Open it and press Sync now to force a
first read. The connection reads Awaiting first sync until that lands, then Last synced and
a time.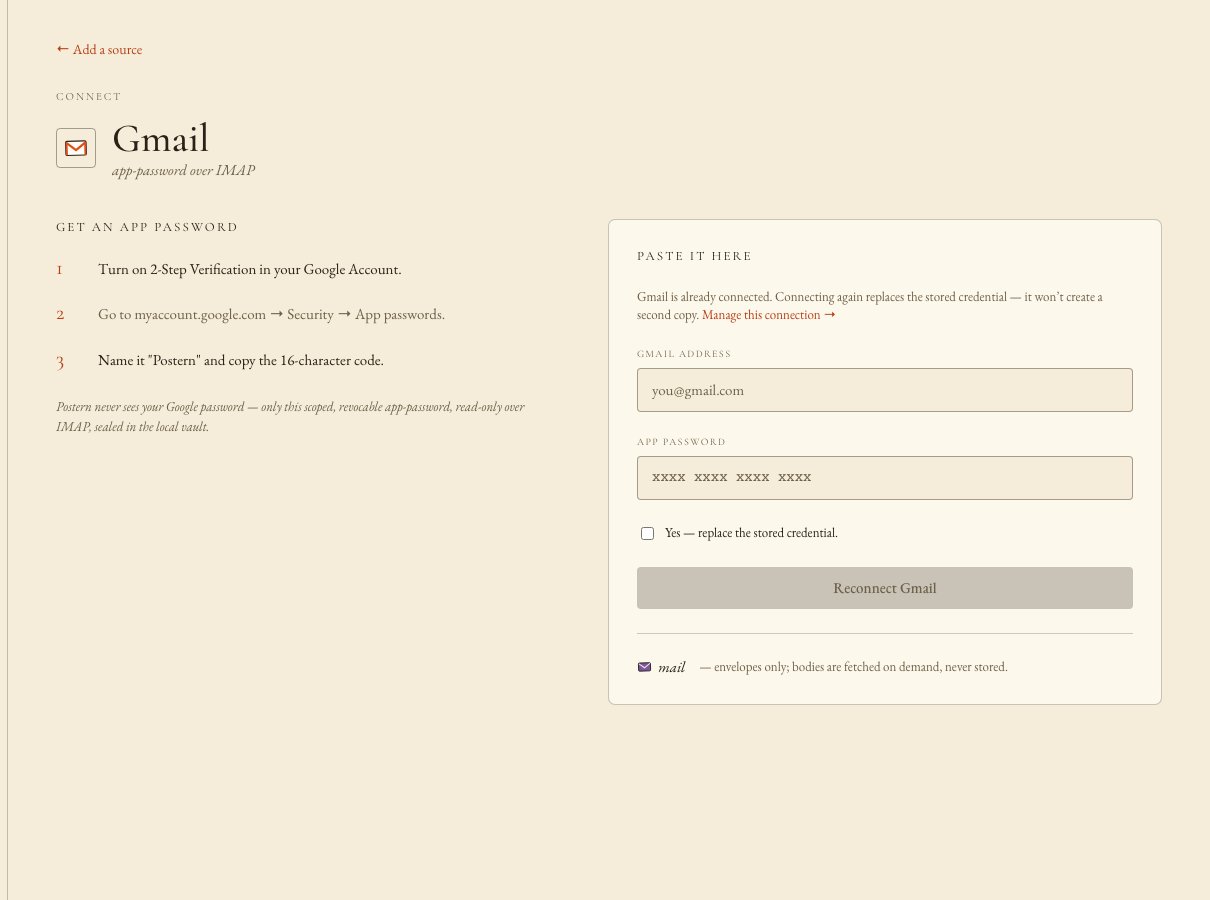
The Console's Gmail screen, captured on an already-connected source. On a first connection the button reads Connect Gmail. The numbered steps are from an older Console build.
A Gmail app password is 16 characters — check you copied all of it (spaces are fine, they’re ignored)., part of the password did not come across. Copy it again from the
dialog, or create a new app password.Create a Cloud project
My Project and a
number — replace it with a name you will recognise. Under the field Google prints Project ID: with
an identifier it generated, then It cannot be changed later. Leave Parent resource at
No organisation. Press Create.Then reopen the picker and select the new project. Google does not always switch you into it. Once
it has, the picker carries the project name on every page in this part.Welcome, <name>!,
with your own account name in place of <name>. It holds a Country list and a Terms of
Service checkbox that reads I agree to the Google Cloud Platform Terms of Service, and the terms of service of any applicable services and APIs. Tick that checkbox and press Agree and
continue.A banner then sits across the top of every page. On an account that has never tried the paid tier
it reads Start your free trial with $300 in credit. and carries Learn more, Dismiss and
Start free. On an account whose trial has ended it reads Your free trial is over but you can still access 20+ always-free products with a full account. and carries Learn more and
Activate. Postern needs neither. Ignore the banner, or press Dismiss where it offers one.Enable the two APIs Postern reads
APIs and services / API library / Browse, and the page heading reads API Library.Search for calendar. Google returns 4 cards: Google Calendar API, Calendar MCP API,
CalDAV API and Workspace MCP API. Click Google Calendar API, the one by
Google Enterprise API. A search result is a card, not a button.The card opens a page headed Product details, with the tabs Overview, Documentation,
Support and Related products. Its Additional details block reads
Service name: calendar-json.googleapis.com. That is the right one, even though it does not read
calendar.googleapis.com.Enable the API from that page. The heading then reads API/Service details, Status reads
Enabled, and Disable API sits at the top.Do the same for People API.Wait a minute or two after the second one before you connect from the Console.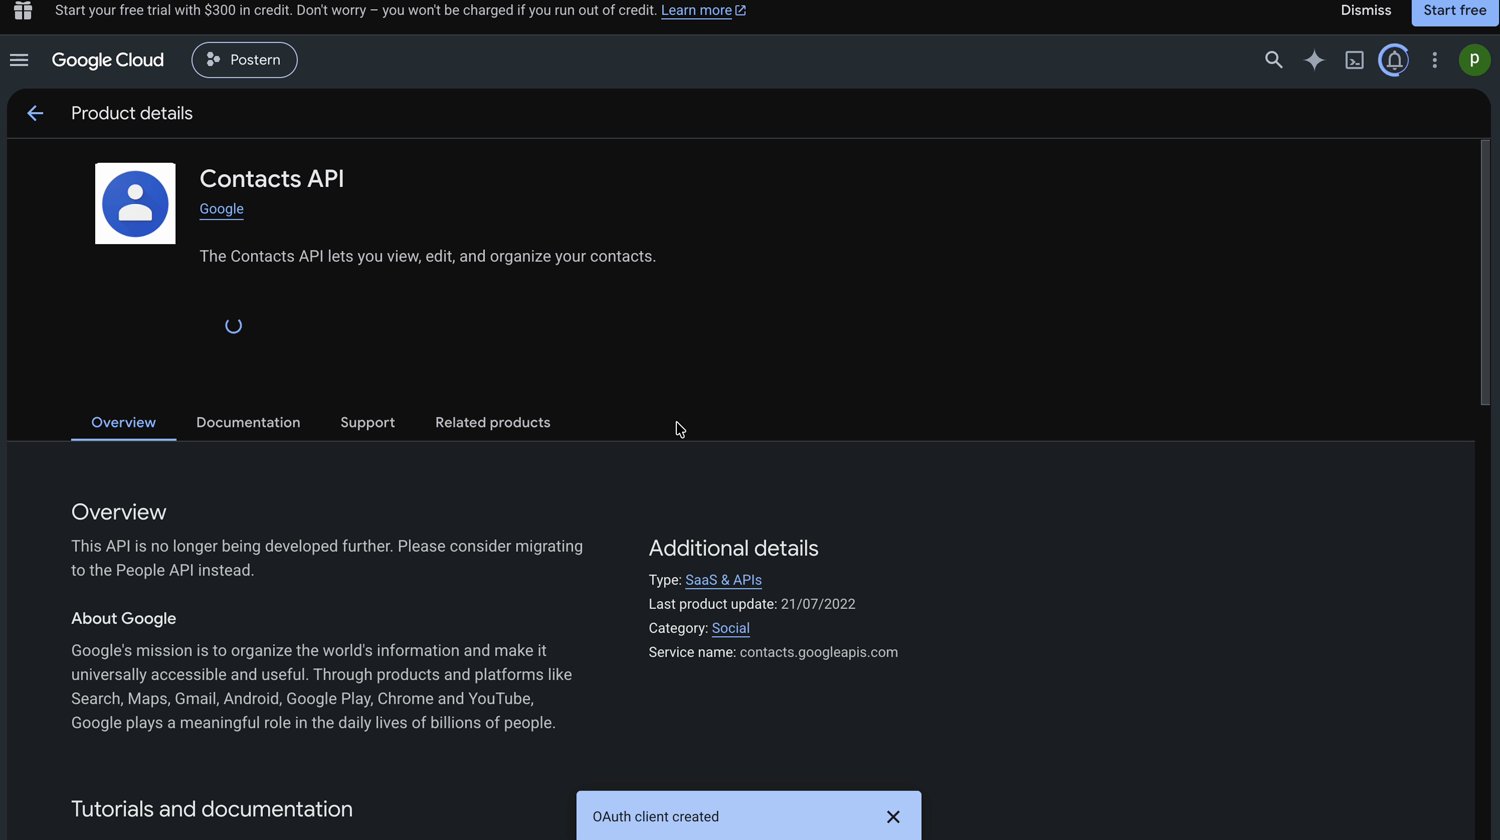
Google's page for the old Contacts API. Service name contacts.googleapis.com. If your screen reads like this, you enabled the wrong one.
Set up the consent screen
Postern. Then pick your own address in User support email,
also required, whose note reads “For users to contact you with questions about their consent.” Press
Next.2 · Audience. Two options, each with its own description:2 beside Audience turns into a red error mark. That mark
is the whole warning.OAuth configuration created., and you land on a page headed OAuth overview.
Under Metrics it reads “You haven’t configured any OAuth clients for this project yet.” with a
Create OAuth client button. That is correct. The client comes two steps from here, and there is
one thing to do first.Add yourself as a test user
1 user (1 test, 0 other) / 100 user cap.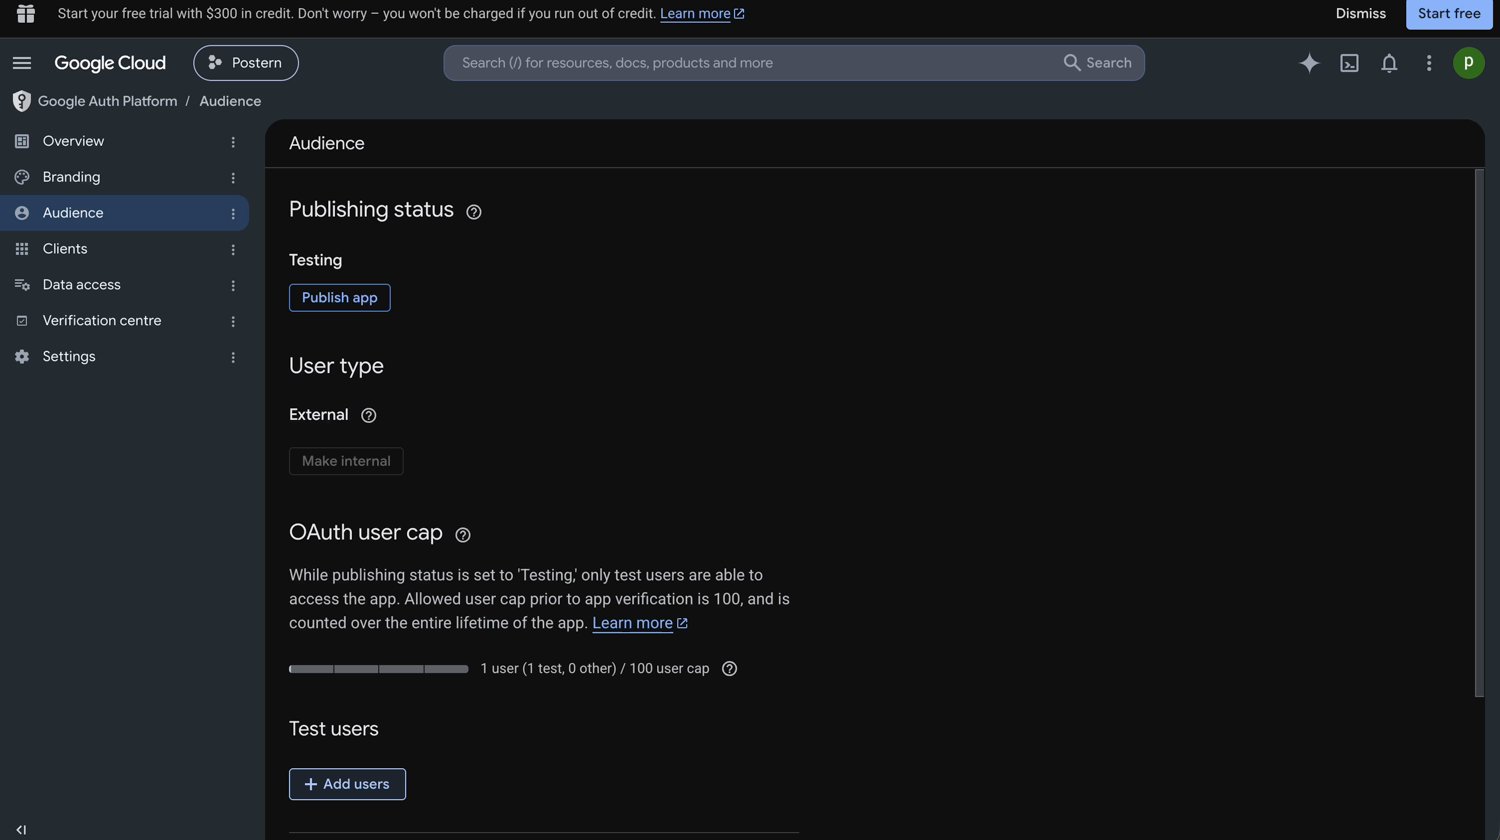
Google Auth Platform → Audience. Test users is at the bottom; Clients, where the next step goes, is in the left navigation.
Create the OAuth client and paste in the redirect address
http://localhost:8787/connect/google. Its left
column lists four numbered steps. The third reads Create an OAuth client, type Web application —
add this redirect URI, pasted exactly:. Under it sits the address, with a Copy button beside it.Press Copy. The button then reads Copied. On a stock install the address reads:Web client 1. Google’s note
reads “The name of your OAuth 2.0 client. This name is only used to identify the client in the
console and will not be shown to end users.”Under Authorised redirect URIs — the section whose note reads “For use with requests from a web
server” — press + Add URI. A field appears, labelled URIs 1 and marked required, which shows
https://www.example.com until you type. Paste the address you copied.Do not use Authorised JavaScript origins above it, whose note reads “For use with requests from a
browser”.Both section labels change spelling with the account’s language. These captures read Authorised;
other accounts read Authorized, with a z. Match a section by its note, not by its spelling.Press Create. Google opens a dialog headed OAuth client created. It holds Client ID,
Client secret, Creation date, Status Enabled and a Download JSON control. Each of
the two values has a copy control beside it. Copy both now, then press OK.Two lines in that dialog matter. One reads “The client ID can always be accessed from the Clients tab
under the Google Auth Platform.” The other repeats the last step’s rule: “OAuth access is restricted
to the test users listed on your OAuth consent screen”.Google’s own note at the foot of the form reads “Note: It may take five minutes to a few hours for
settings to take effect”.Google’s APIs and services → Credentials page lists the same clients, under OAuth 2.0
Client IDs. Either route reaches them.Paste both halves into the Console and sign in
http://localhost:8787/connect/google). Under Configure
the app, paste the client ID into Client ID, and the client secret into Client secret.Google needs both halves. With only the ID, the Console answers Google is a confidential client — paste the client secret too, or the sign-in will be refused.Press Save & sign in with Google. The button reads Redirecting..., and Google’s account chooser
opens in the same tab. The Console hands that tab over, so finish anything else you have open in it
first.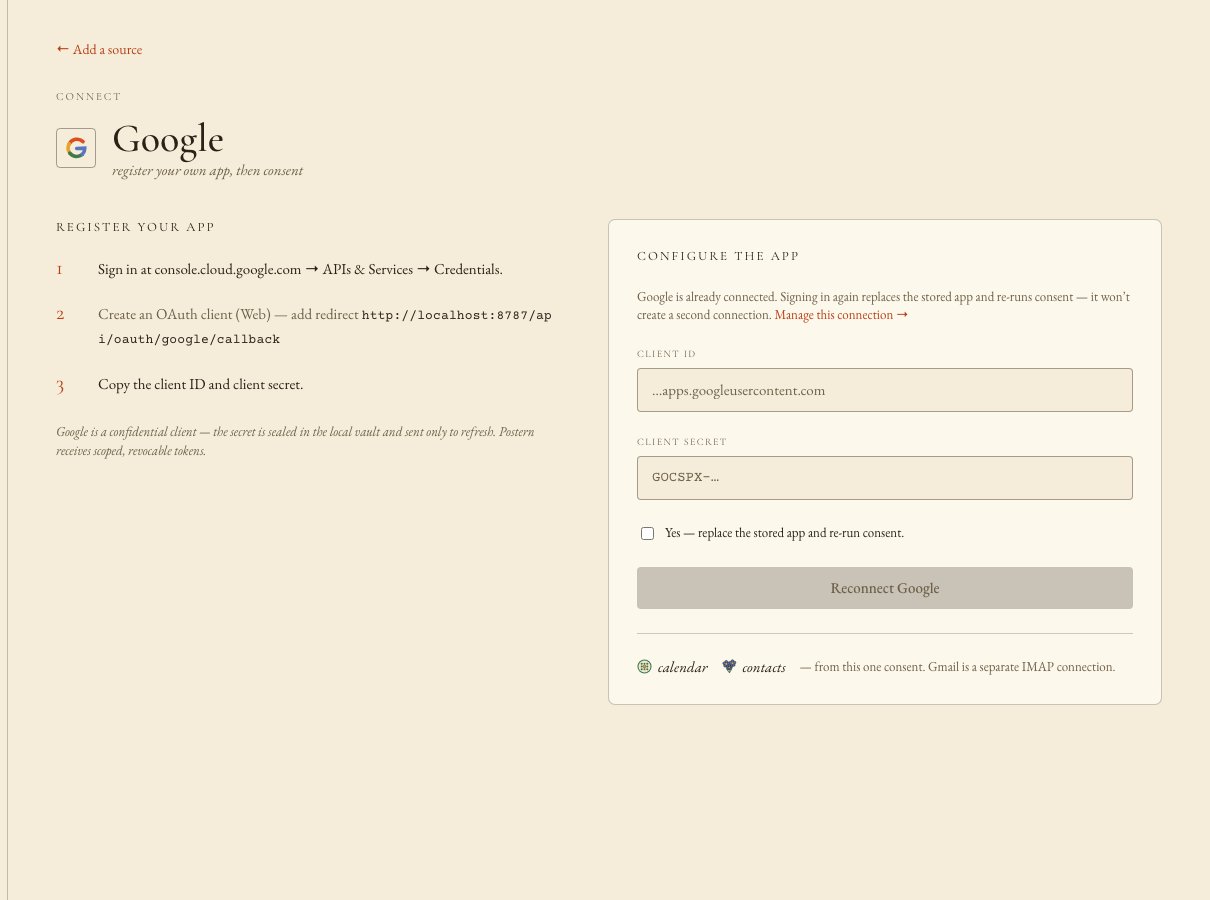
The Console's Google screen, captured on an already-connected source. On a first connection the button reads Save & sign in with Google. The numbered steps are from an older Console build — the current one carries four, and the redirect address sits in the third.
Continue past the warning and tick every permission
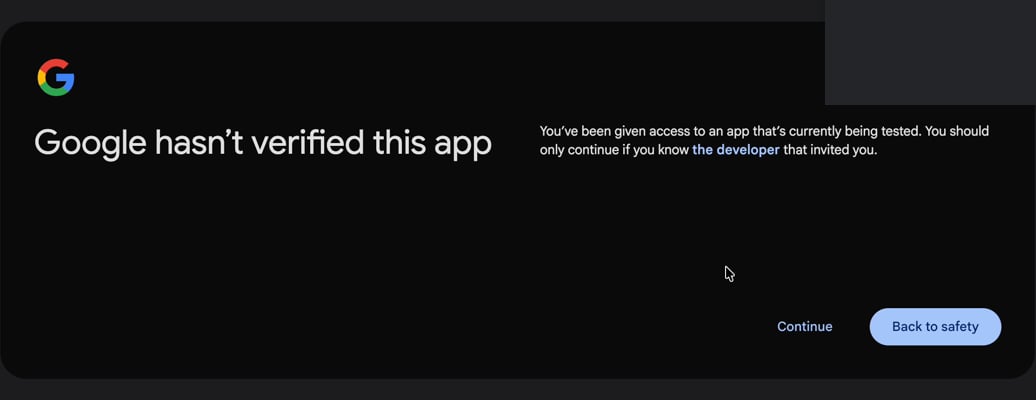
Continue is the plain text link, to the left of the blue button. The blue button is Back to safety, and it cancels.
- See and download your contacts. —
contacts.readonly - See and download any calendar that you can access using your Google Calendar. —
calendar.readonly
{"error":"invalid or expired state"}. Postern stored nothing. Start again from the
Console’s Google screen; you lose nothing.Publish the app to end the weekly sign-in
Confirm it works
- Sources lists three connections: mail, calendar and contacts.
- Each of the three shows a Last synced time.
- The Console’s Gmail and Google screens read that the source is connected, and their buttons read Reconnect Gmail and Reconnect Google.
- In the project that owns your client, Google Calendar API and People API both read
StatusEnabled. Each page carries Disable API at the top. - On Google Auth Platform → Audience, User type reads External, and Test users lists the address you signed in as.
If something went wrong
What you have now
Three connections: mail from Gmail, calendar and contacts from Google. Any agent you grant mail, calendar or contacts reads from them. For mail, Postern stores who sent it, the subject, the dates and the preview line. It never stores the message text — it fetches that when an agent asks for it. Gmail comes in over IMAP, the standard way mail apps read a mailbox, so your Gmail address is also the login. Calendar and contacts are read-only. Postern cannot change anything in them. Why the Google connector can never act, whatever permission it holds What this costs you from here on:- While Publishing status stays Testing, you sign in again every 7 days. Publish the app ends that.
- Revoke the app password or the Google sign-in at your Google Account, not in Postern. Each stops only its own connections, and a fresh sign-in overrides an earlier revocation.
- Connect a source again and Postern replaces the saved credential rather than adds a second one. First it makes you tick a box — Yes — replace the stored credential. on Gmail, Yes — replace the stored app and re-run consent. on Google.
- Postern encrypts the client secret and keeps it on your own machine. Postern sends it only to Google, only to ask for fresh access